Welcome to Cold War Gamer, a blog I am using to record my Cold War wargaming projects. These range from fictitious Cold War hot projects to historical conflicts that took place around the globe throughout the Cold War era, all modelled and gamed in 20mm. The blog includes links to various resources useful to the Cold War Gamer.

My current projects include: Central Front; British & Soviet. South African Border War; Angolans and South Africans. Soviet Afghan War; Soviets and Afghans
Showing posts with label APC. Show all posts

Saturday, 2 January 2016

Modelling - Converting Hobby Den's BTR 60PB to a BTR 60PU


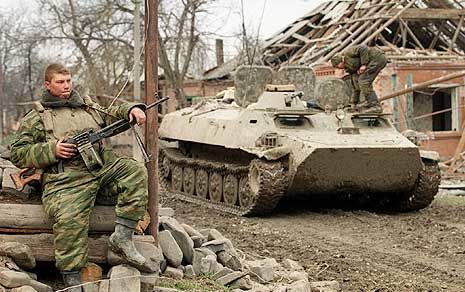
As part of creating artillery and air defence units for the breakthrough project I kicked off a year or so ago I discovered a need for some armoured command vehicles.  The thought was to use specific communications vehicles rather than the k variants found in Motor Rifle Battalion and Company headquarters.  Armoured command vehicles were produced by the Soviets for the BTR 60/70 and 80 series vehicles and these were used extensively within the units I had in mind. 


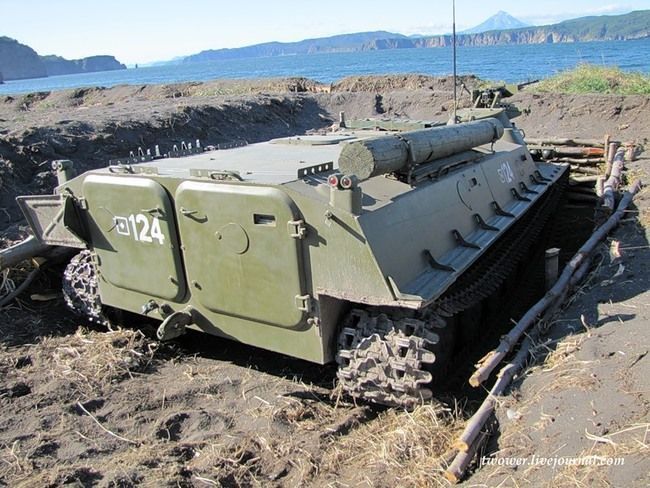
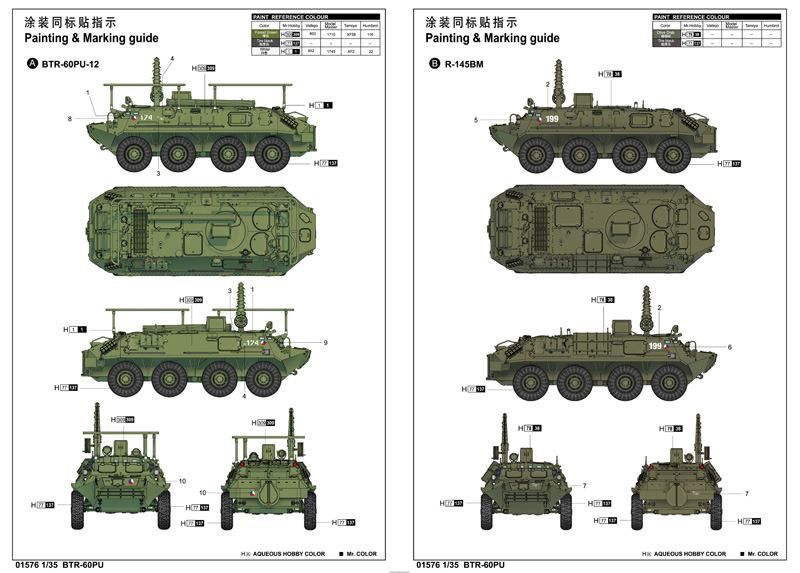
The obvious choice was the  BTR-60R-145BM or one of its more modern variants the vehicle is a turretless version of the BTR 60, fitted with:
  • A collapsible frame antenna 
  • The AMU 10m telescopic mast 
  • The AB-1-P/30 generator, 
  • 5 Radio sets 
  • A TA-57 field telephone.  
The vehicle also seems to attract the designation BTR 60 PU and  is visually similar to the BTR 60PU-12 an Air Defence command vehicle which would also be useful.


An analysis of the available imagery identified the following tasks to complete a conversion from a BTR 60 PB into the required command vehicles:


  • Fill Hole in hull for turret
  • Build a box to represent the AB-1-P/30 generator
  • Create some stowage box's for the side of the vehicle
  • Create a representation of the AMU 10m telescopic mast
  • Represent the stowed antenna tube on the top deck together with its end caps
  • Mount jerry cans on sides of vehicles 


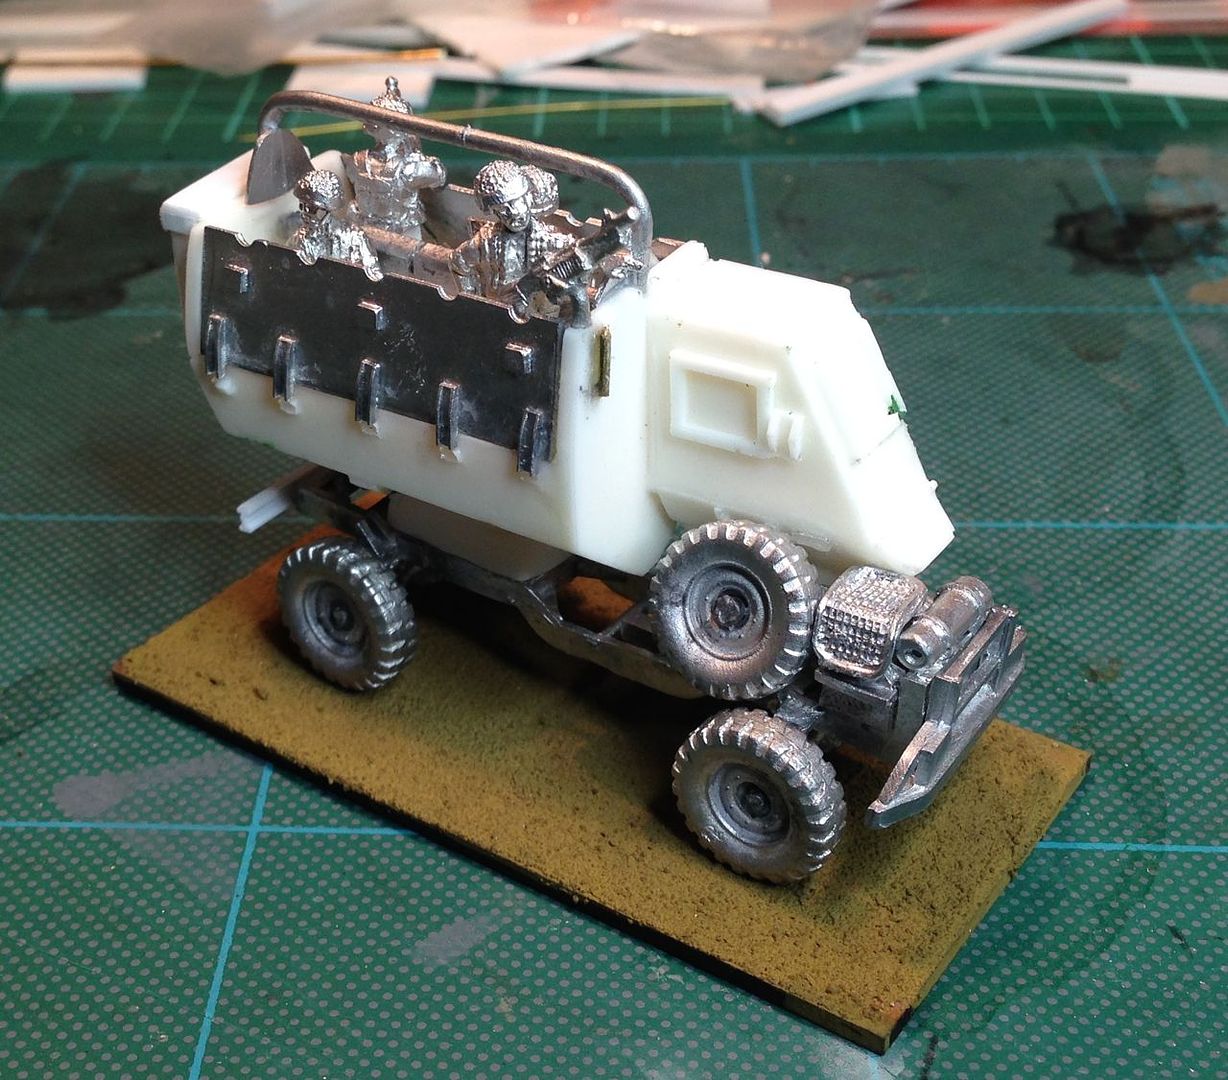
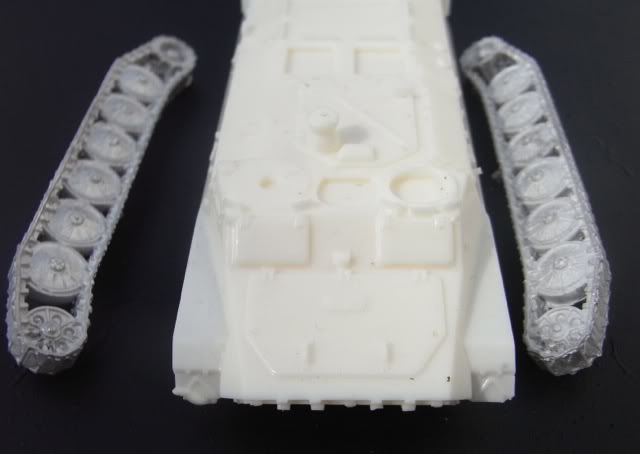
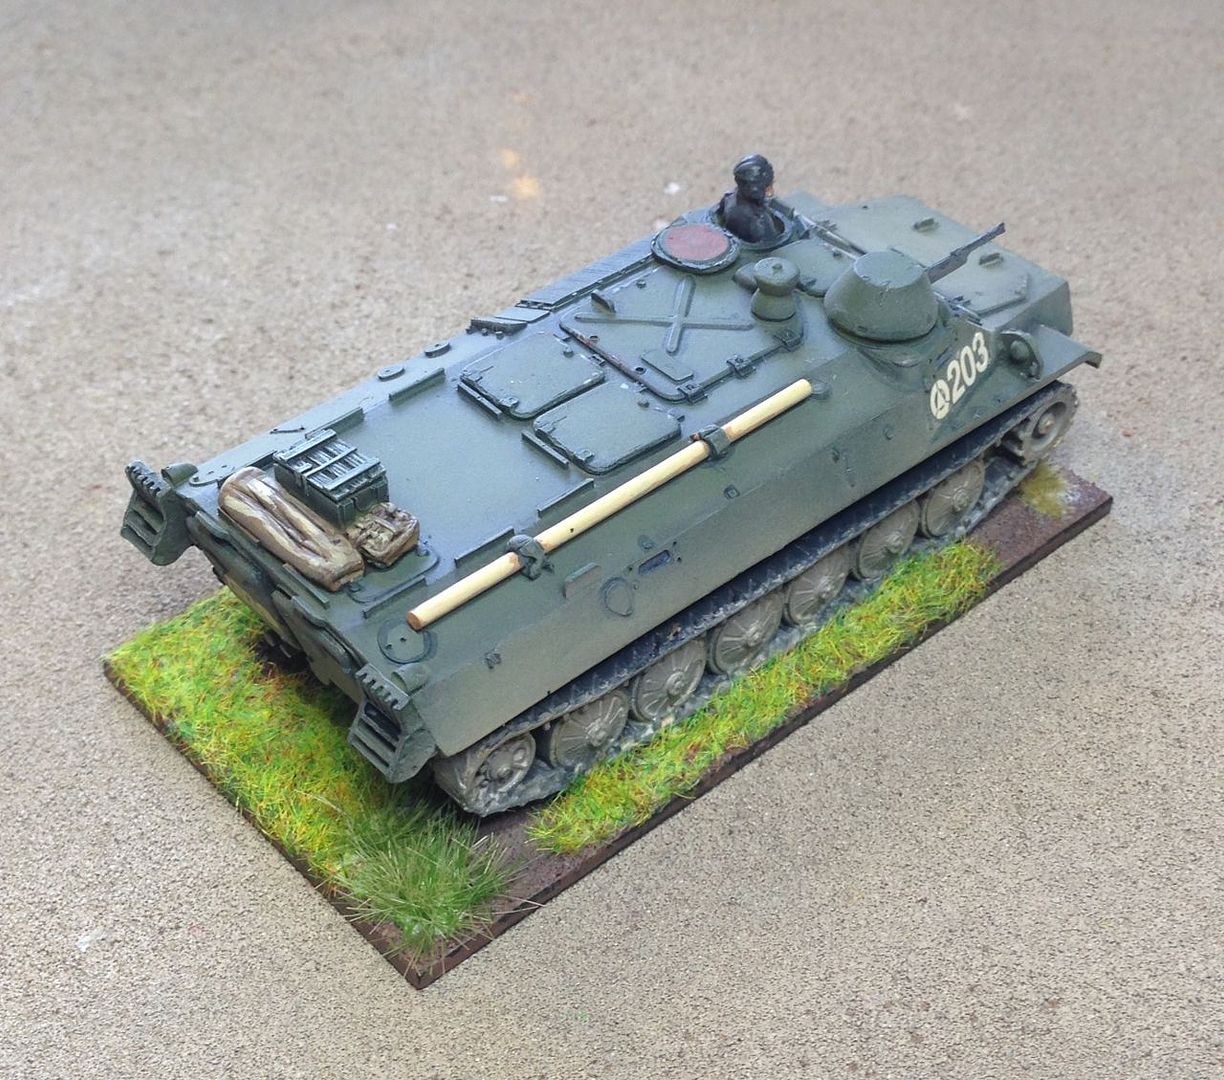
  • The BTR 60PB I have chosen for the conversion is produced by the Hobby Den, which is an imposing resin and white metal kit with some clever ideas that give you a lot of crewing options as hatches are white metal castings that fit over recessed hull areas providing scope for crewing options at much reduced effort compared to other resins where the hatch and hull would need drilling and a new hatch creating to achieve the same effect.


    Since I commenced this project a number of other models have come onto the market giving a degree of choice in the models that can be used notable amongst these is the S Models BTR 60 PB kit.  The quality of both the resin hull and the white metal wheel set and hatches has been good on all the copies I have received with small amounts of flash on the white metal parts and almost no air bubbles on the resin hull and turret.  The base of the turret is marginally convex but this was not really relevant to the model being built.


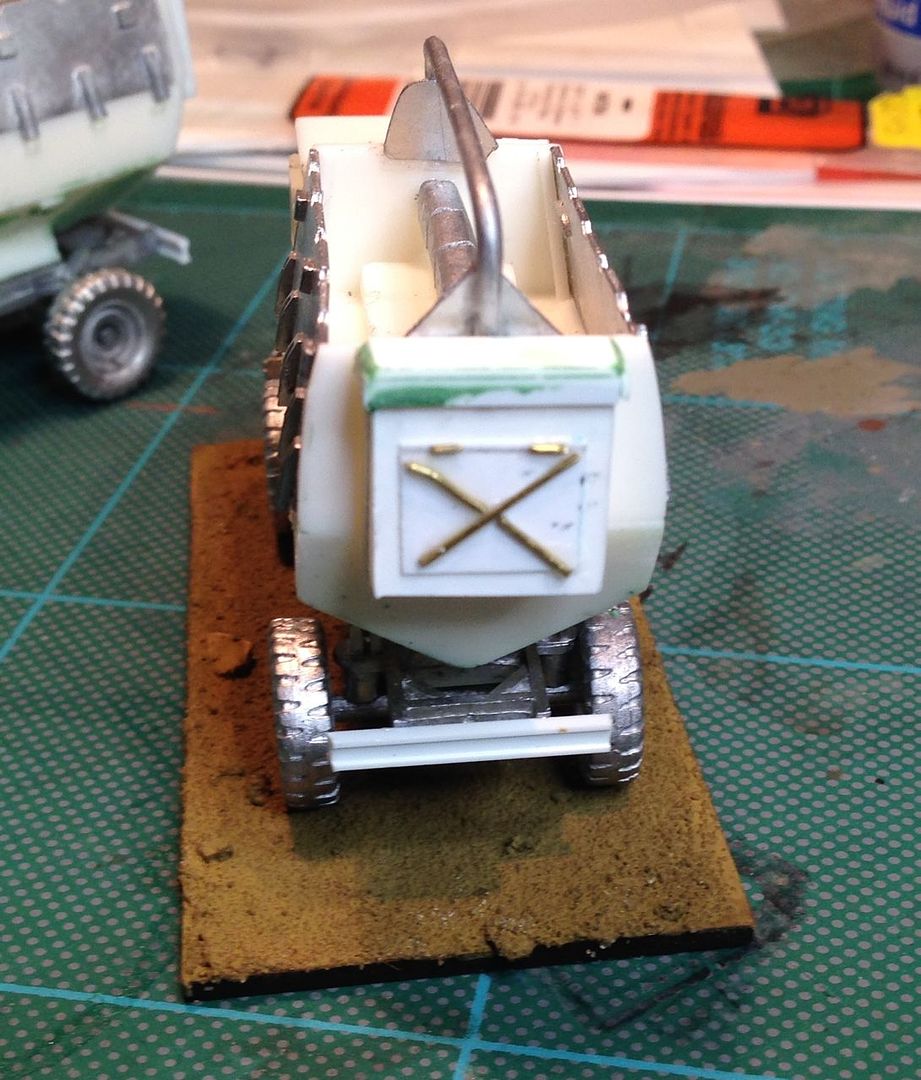
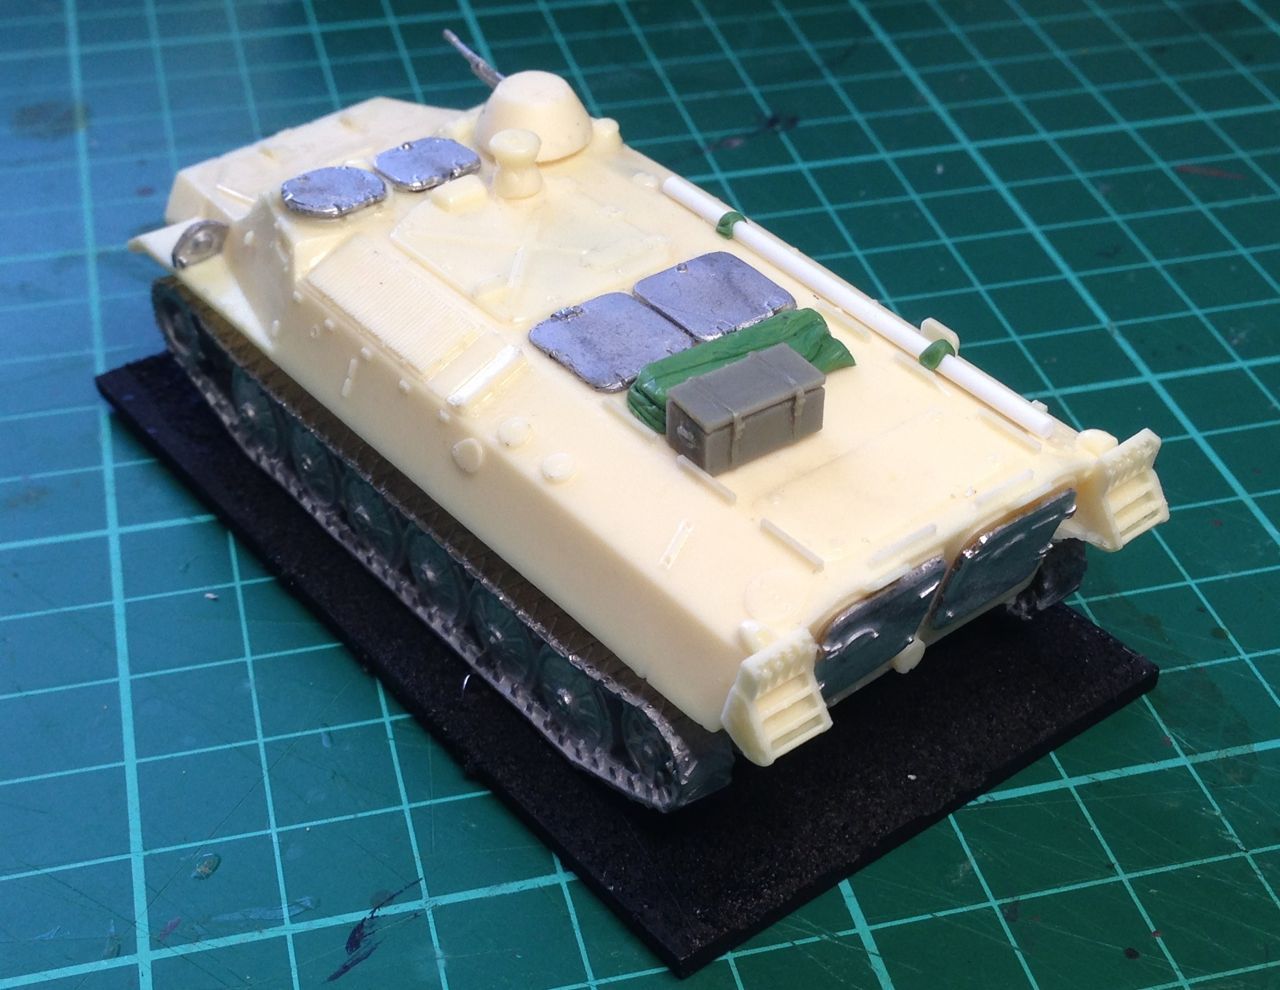
    The conversion is very straightforward and can be done with the frame antenna erected or folded.  To simplify the problems around building the frame antenna I attached it directly to the hull . This avoided the needs to build the mounts and created a robust structure. I also simplified the frame from a double tube to a single tube. The frame supports and the frame itself were made from lengths of brass rod and to ease the problems of height adjustment I used green stuff to attach the frame to the upright frame supports.


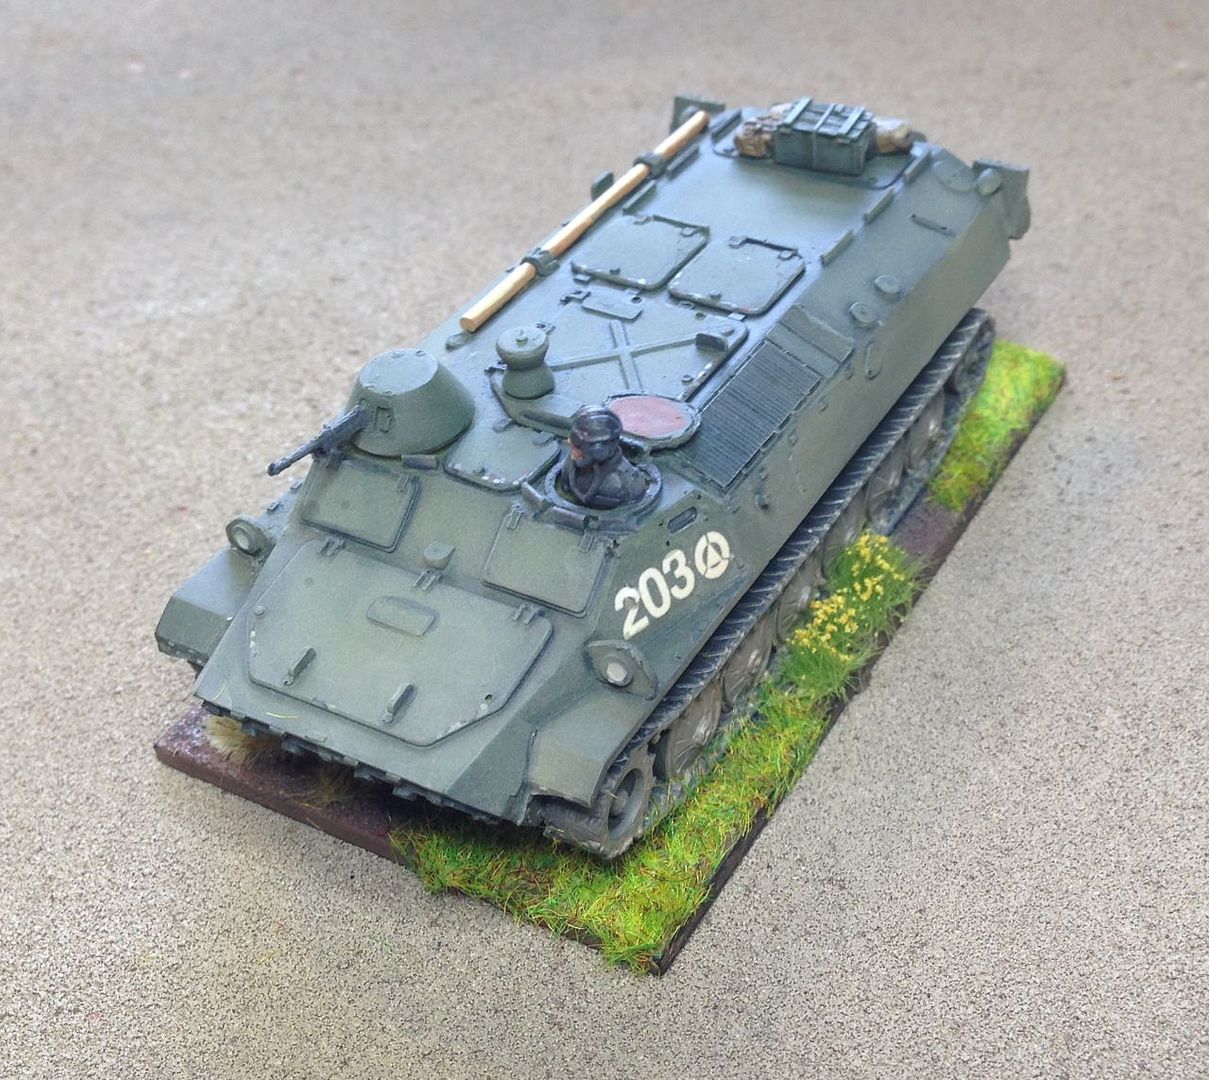
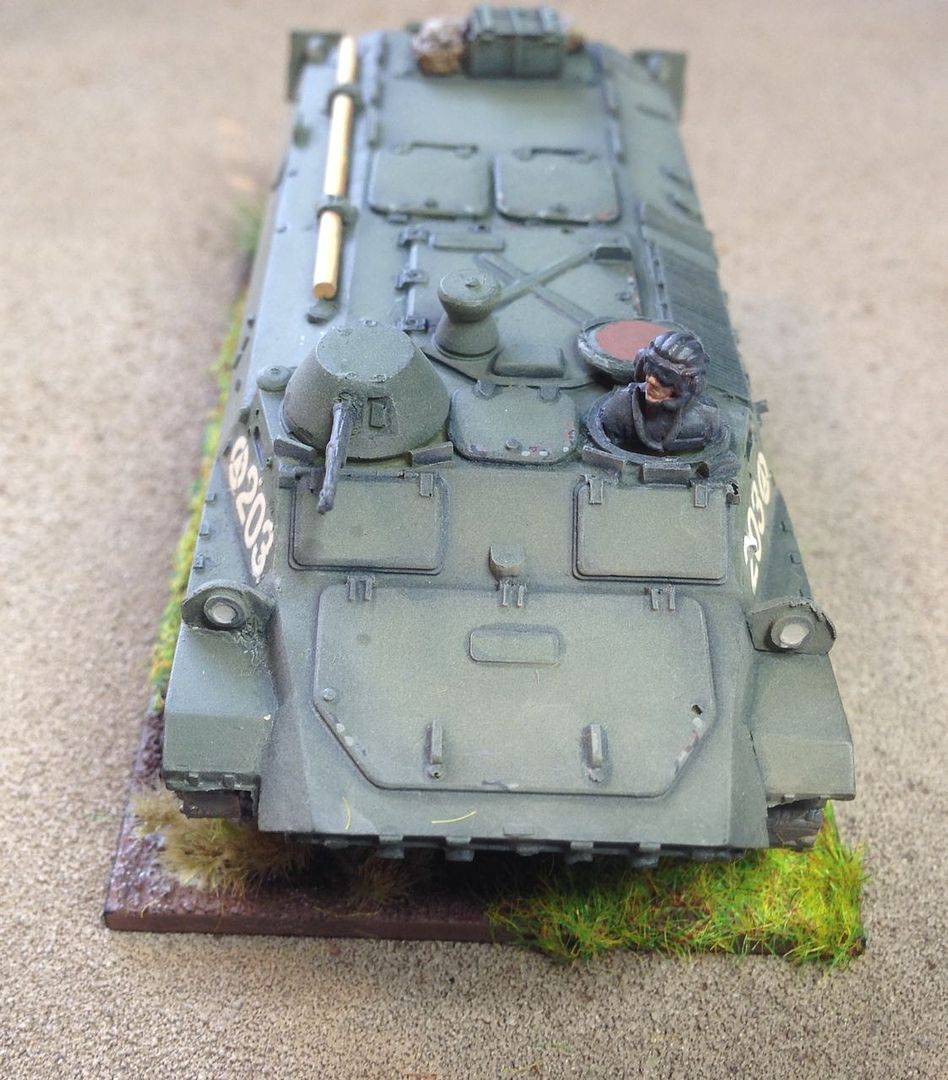
    Both the AMU 10 Telescopic mast and what I have termed the stowed antenna tube on the hull roof were cut from plastic rod.  The use of a cover fashioned from green stuff for the AMU 10 got around the need to model the detail at the top of the telescopic mast, although this could have been produced using  the mast components that come with ACEs BMP-1Ksh.


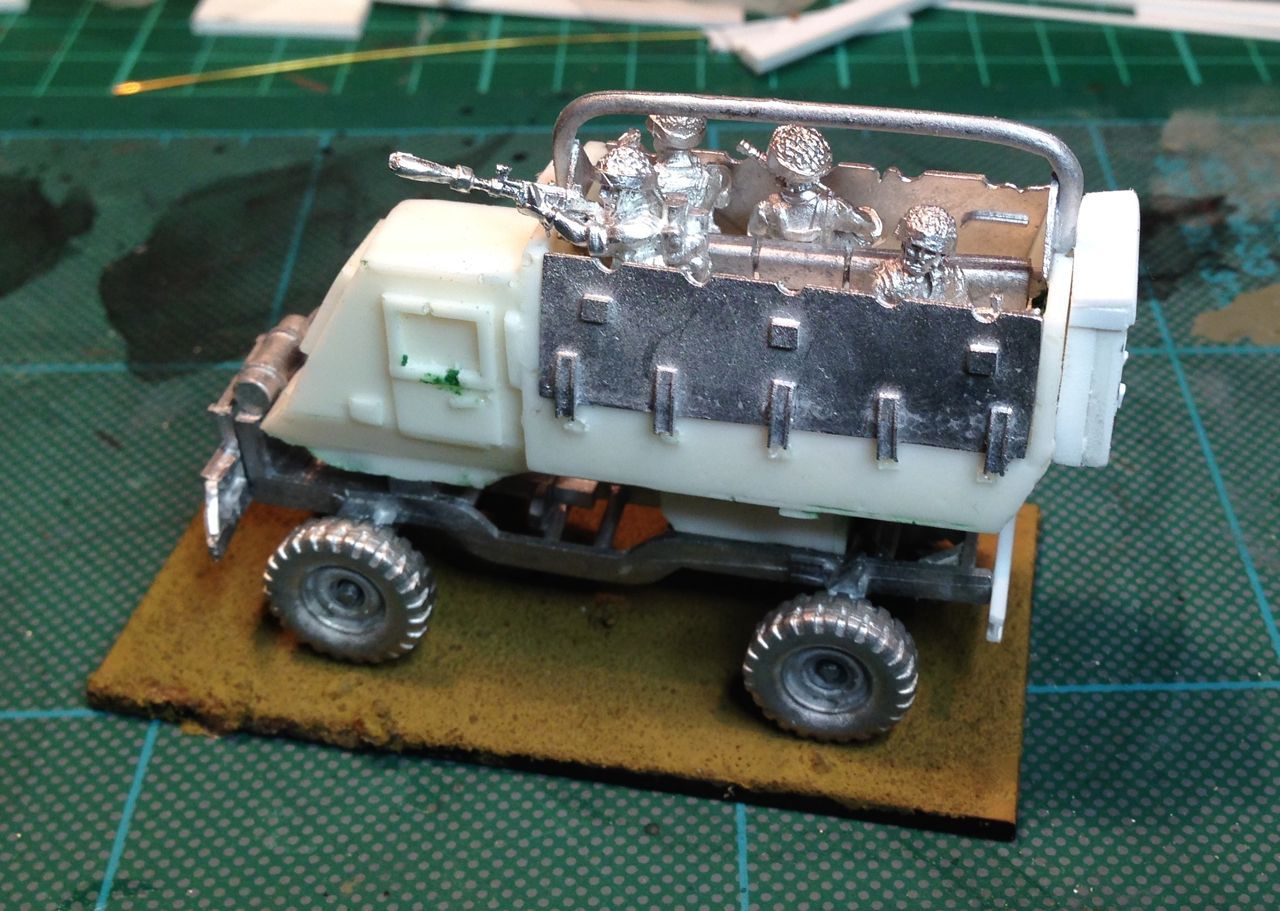
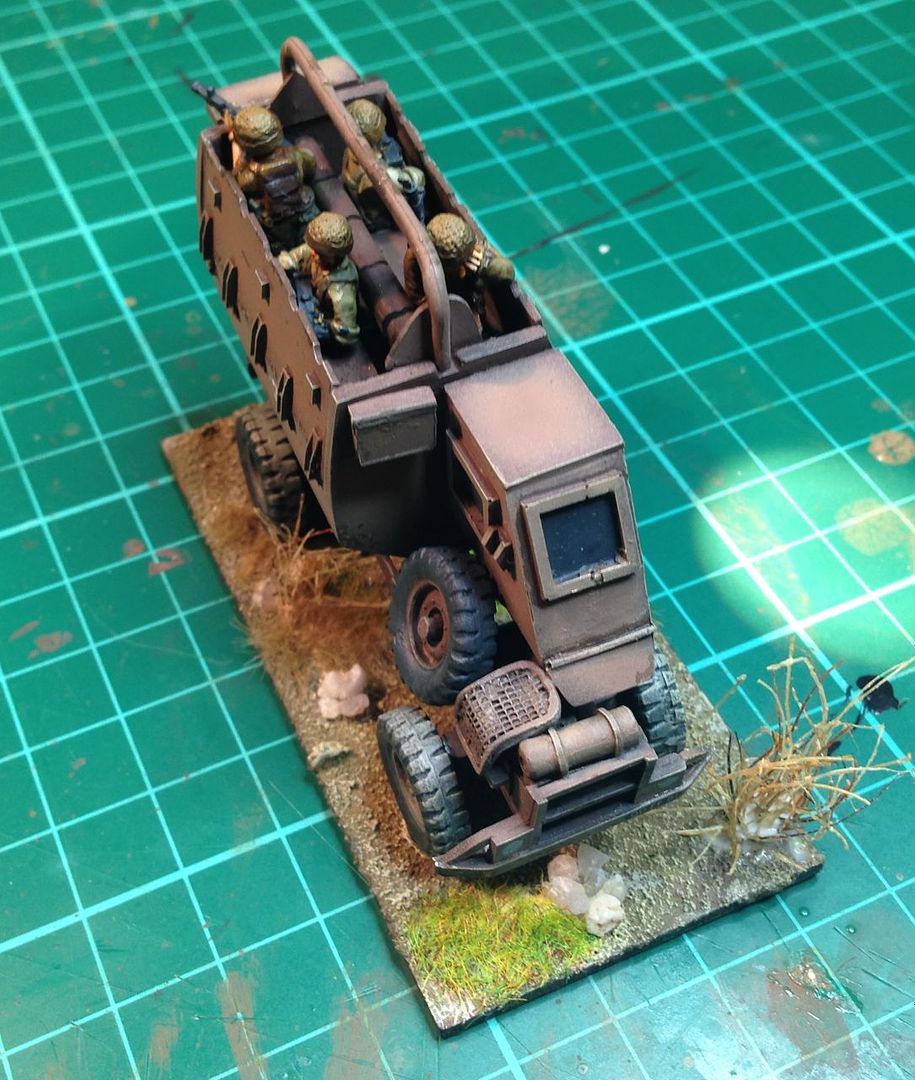
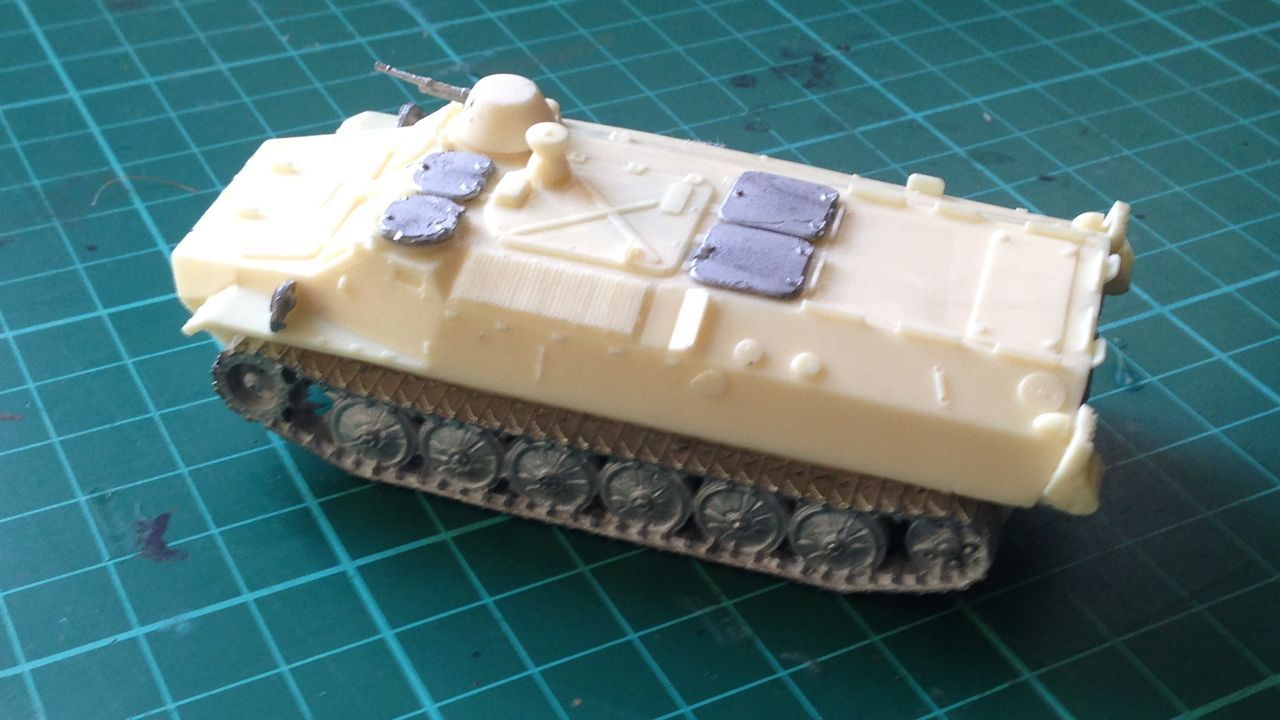
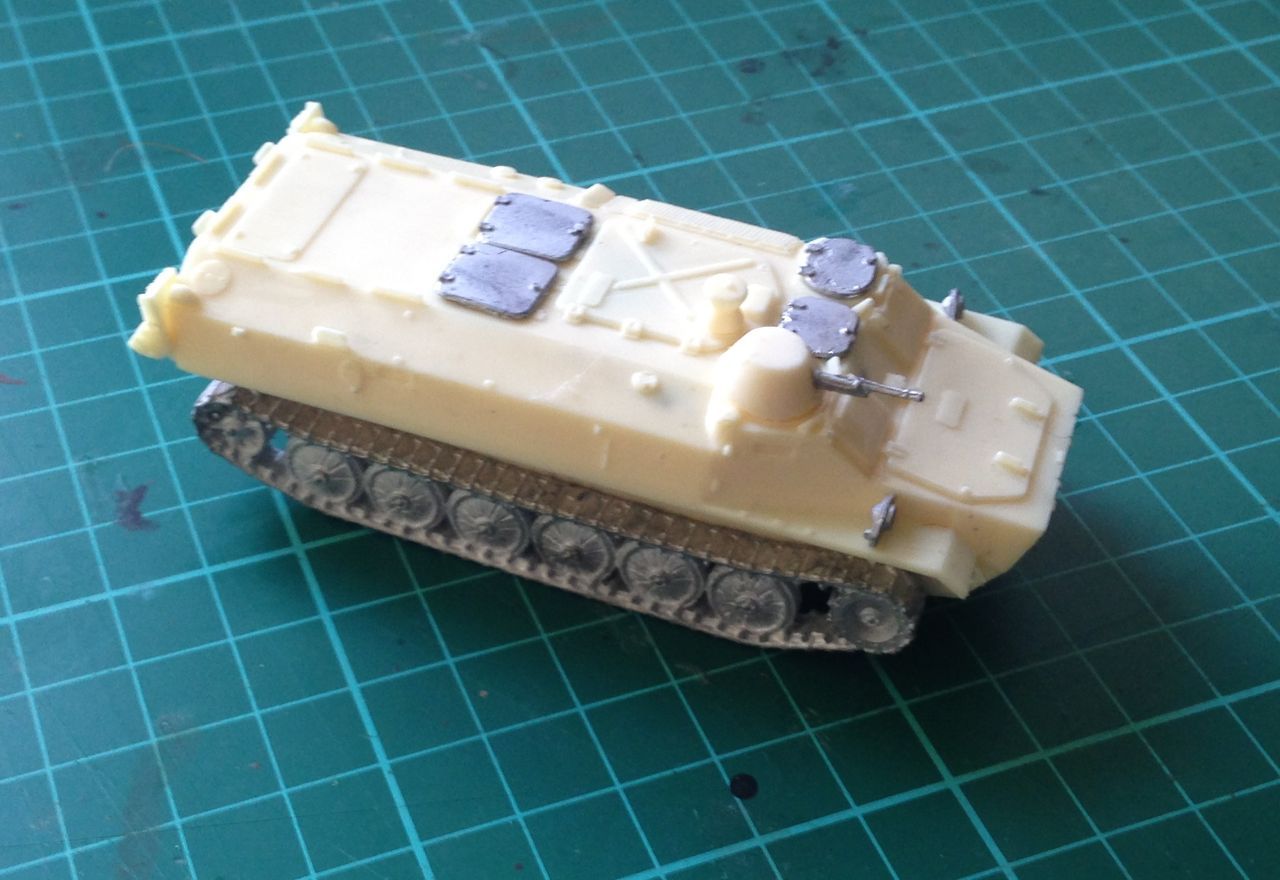
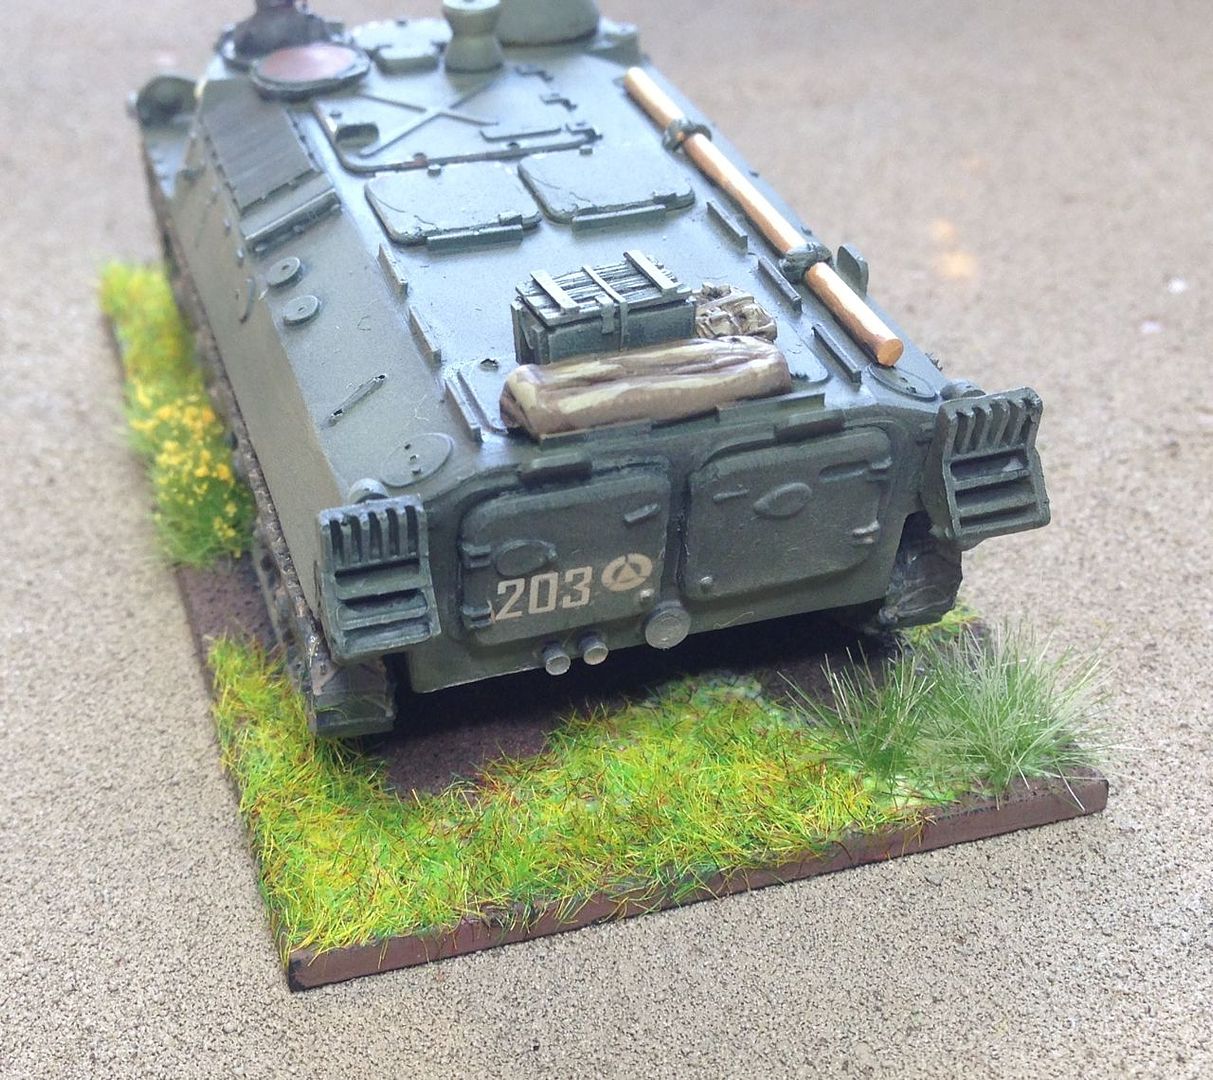
    The Generator box was the final component of the fixed vehicle equipment and this was created through layering plastic strip to create an oblong box structure that would be easy to replicate consistently given that I needed a few of these vehicles.   All the other components I viewed as part of stowing the vehicles as the images I had collected showed a degree of variability in type and placement.  The Images variously show jerry cans and a large external stowage box mounted on the left and right hand side of the vehicle. which goes on which side seems to vary.


    Stowage baskets are also seen mounted over the rear engine louvers and there are a number of images with command vehicles supporting a number of roof mounted stowage boxes.  Unusually for Soviet vehicles but less so for command vehicles in general these wagons are often seen with a variety of additional equipment.  


    I have confined my stowage to include the Jerry cans on the right hand side and a large irregularly shaped stowage box on the left.  In addition I added a folded tarpaulin/tent on the roof made from green stuff and marked using a wet knife blade to create the straps folds and creases.  To get the various boxes and jerry cans to mount effectively on the hull it's necessary to file away some of the hull side hatches.


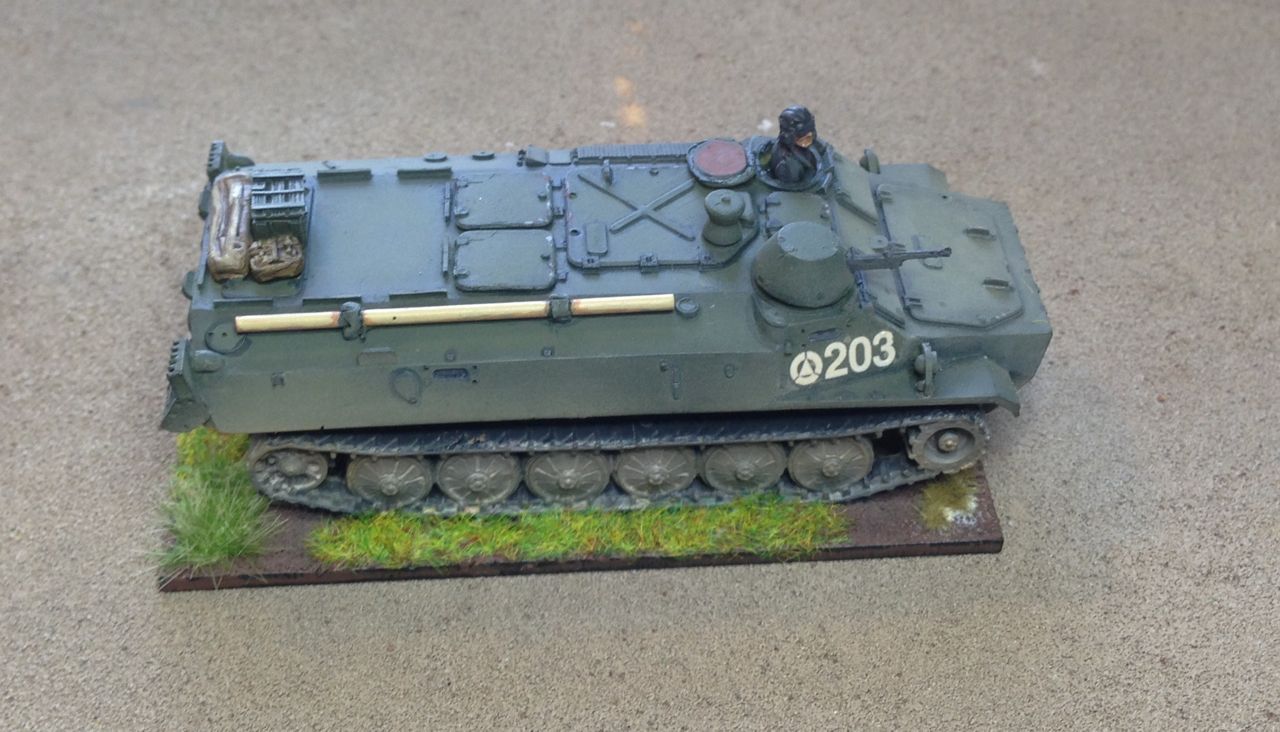
    I commenced painting the vehicle with a pre shade of the lower hull wheels and underside of the vehicles using Tamiya XF-69 NATO Black. The model was then sprayed with Tamiya XF-13 JA Green, using a lighter coat on the lower hull ensures it remains a darker shade.  The panels were then picked out with Tamiya XF-65 Field Grey. A pin wash was applied using the Humbrol Black enamel wash and a blue grey filter applied to selected panels and hatches using a diluted Humbrol Blue Grey enamel wash.  The raised detail was dry-brushed using a mix of Vallejo Russian Uniform and Buff. Detail was then painted in as follows:
    • Vallejo Black Grey for the HMG, Sight blocks, jerry cans and wheels
    • Vallejo sky grey was used for tools.  
    • Vallejo Medium flesh washed with Agrix Earthshade was used for wooden tool handles
    • Vallejo Khaki grey was used for the canvas stowage, washed with GW's Agrix Earthshade before being highlighted with a mix of Khaki grey and buff.

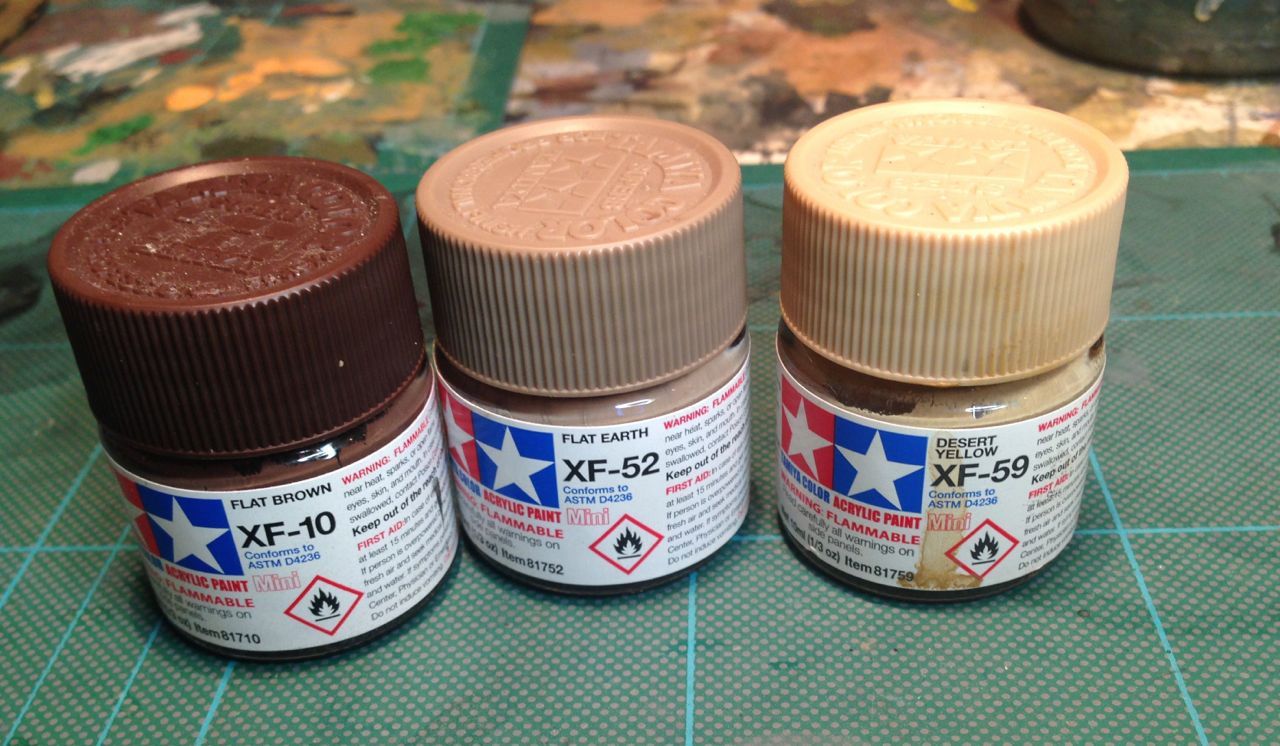
    The vehicle was then weathered using a heavy wash of Vallejo Mahogany Sand primarily targeted at the recesses, before the whole was over-sprayed using Tamiya XF-59 Desert Yellow. 

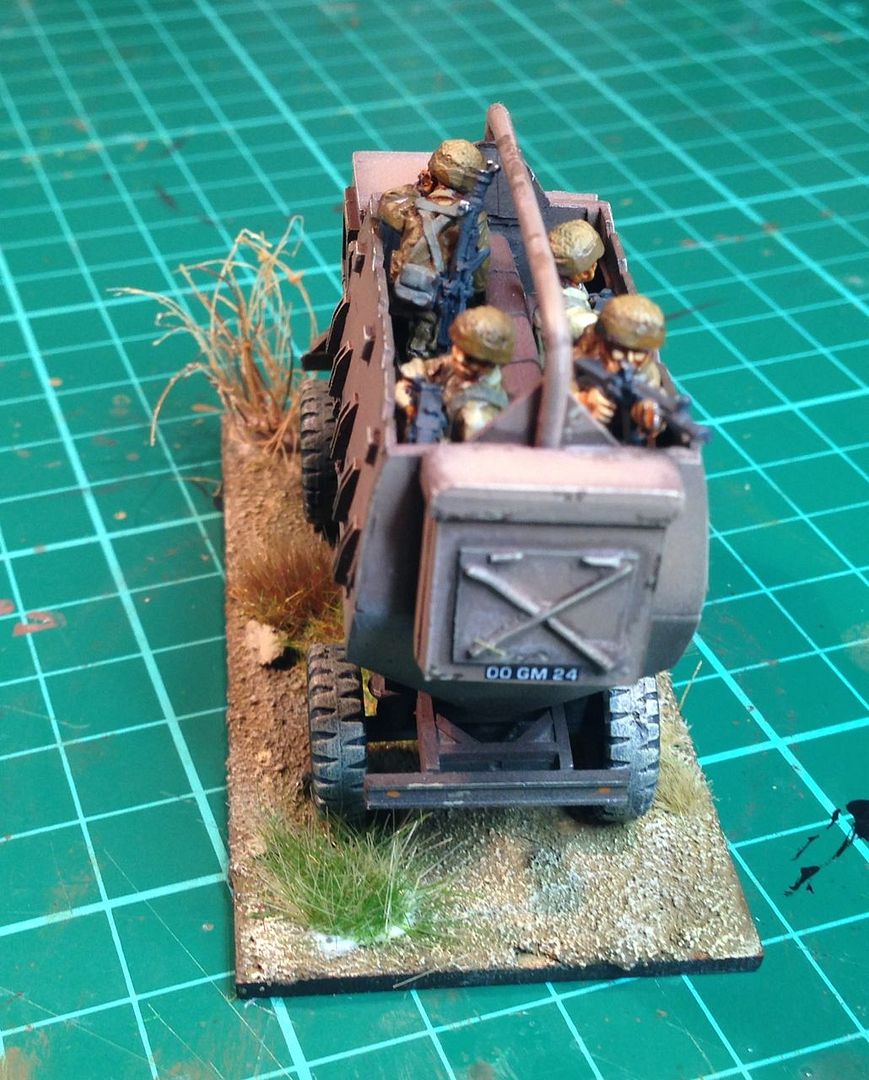
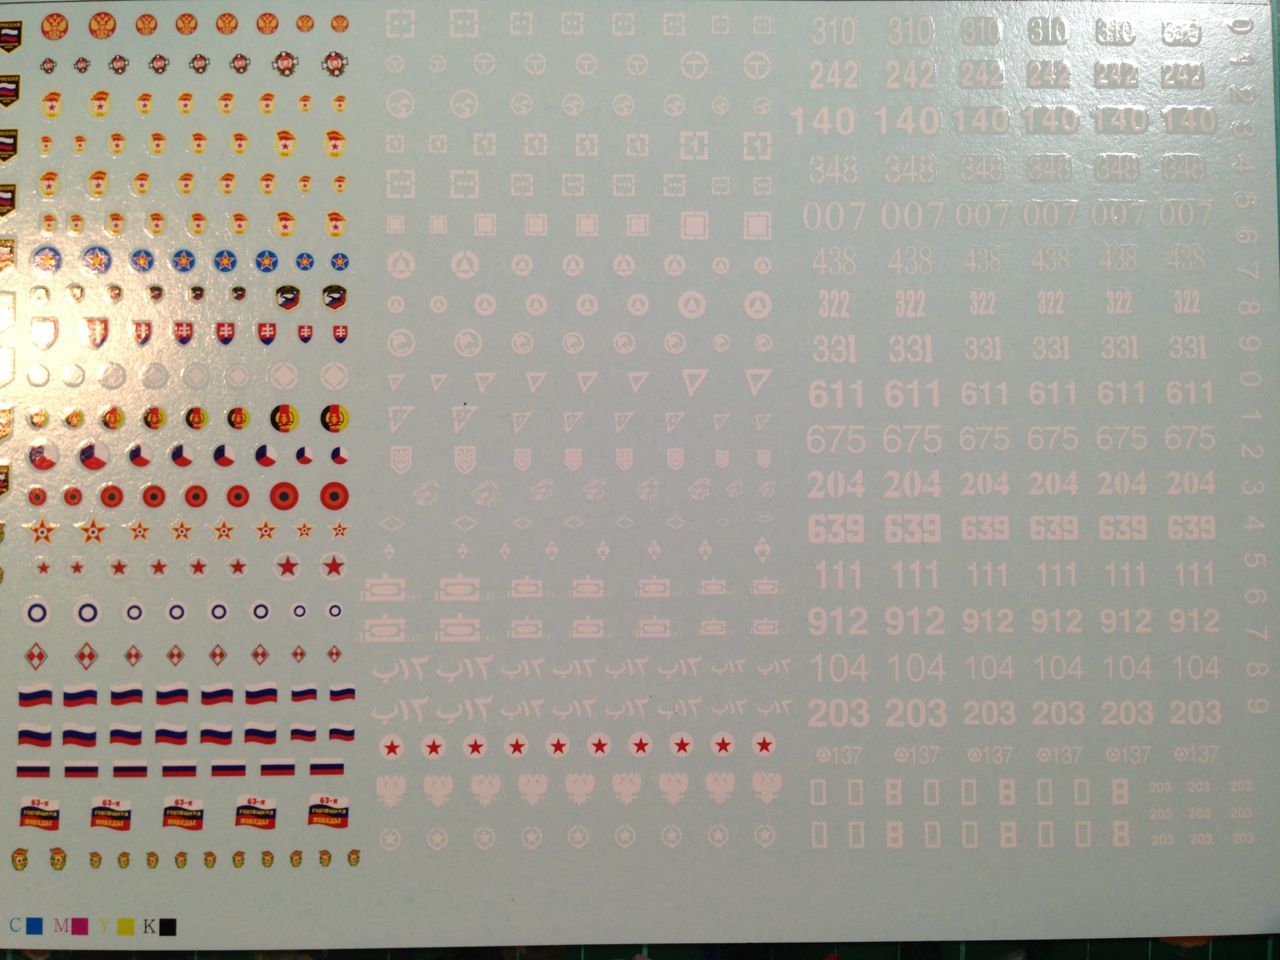
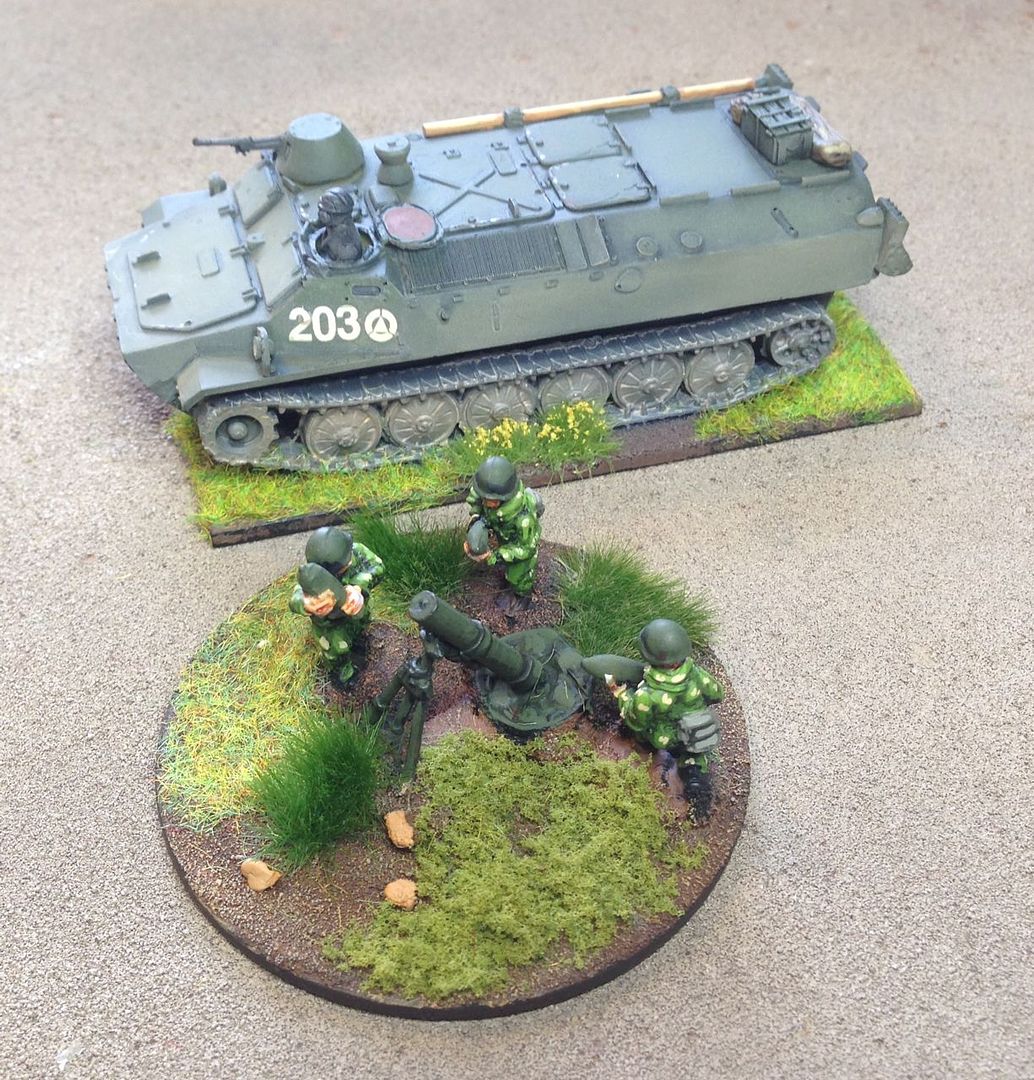
    Markings consisted of a regimental symbol and tactical 3 digit number, with the number coming from QRF and the regimental marking from the model collect large decal sheet.


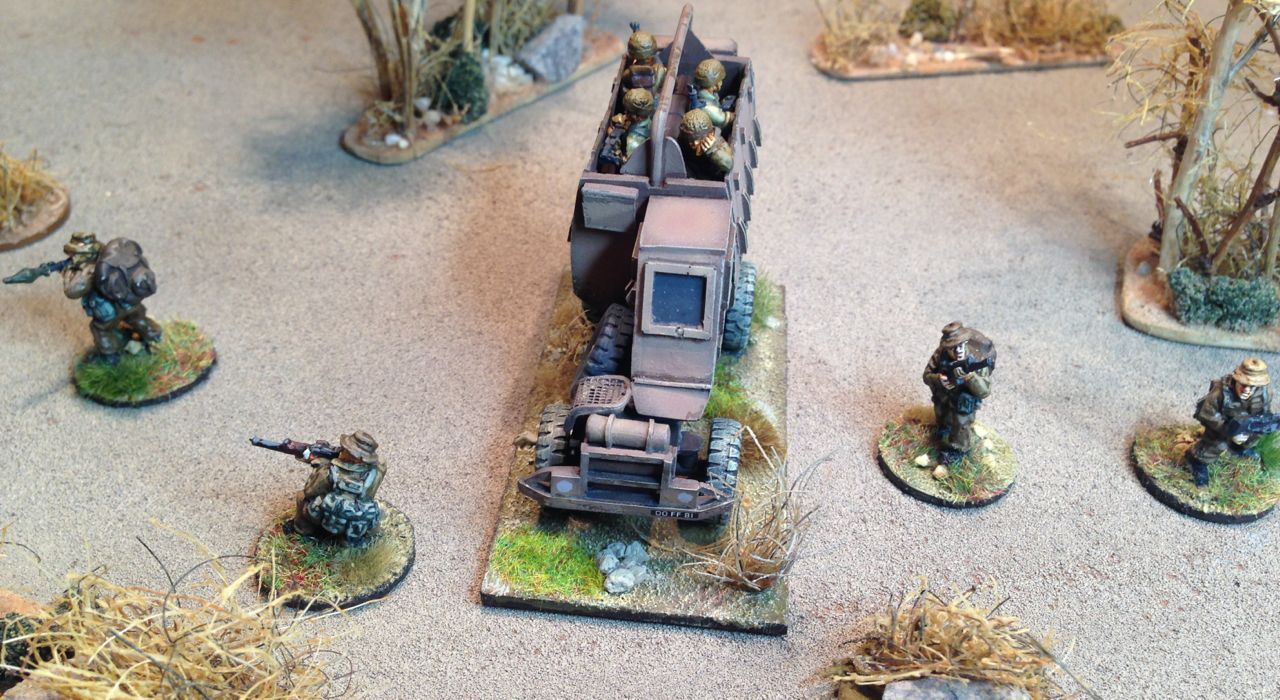
    The vehicle is based on laser cut MDF bases supplied by East Riding miniatures, these are covered in a mix of sand and white glue before painting. Once dry a range of bsing materials have been used to create the vegetation on the base.

    References:

    Books:

    Web:
    BTR-60PB Mini Walk-round Prime Portal
    BTR-60 Army Guide
    BTR-60PU-12 Walk-round
    BTR-60-R145BM

    Other Posts of Interest:

    Tuesday, 19 May 2015

    Review Model - S&S 1/72 South African Buffel


    The Buffel was introduced into the SADF in 1978 to provide mine protected transport.   They were used within mechanised units to transport support elements such as pioners and in the non mechanised units they provided a basic transport capability for the rifle companies whilst support weapons traveled in a mix of Buffles and soft skin vehicles.  They were used by units of 44 Para Bde, and equiped, the Modular and  SWATF, battalions as well as 32 Battalion.  6 Buffels took part in Op Reindeer in May of 78 as part of Task force Julliet and they saw extensive service on both internal and external operations throughout the remainder of the War.


    The vehicle is quintessentially Border War so much so that personally I don't see the point in gaming the conflict with out it. It was an evolution of the ideas from the early mine protected vehicles deployed in Rhodesia and its heritage lives on in the wide variety of MRAPs used globally today.


    For years the only representation of this in 20mm was produced by Bax Models which comes in at £27, costly if you want to deploy them in reasonable numbers and a time consuming build.  In January this year Shaun at S&S had one mastered by AMBN Modelisimo and a couple of weeks ago I got my hands on 4 pre release versions.


    The model is a resin and white metal kit that builds into an excellent representation of this vehicle.  A difficult task given the very open nature of the underside of the vehicle and one which has been put together extremely well by the team at AMBN Modellisimo and S&S.  Essentially the hull is modelled in resin less the side access panels, seat rests, role bars and the chassis which are cast in white metal.


    The white metal components were well cast with little to no flash and the hull side panels are very finely cast.  The underside of the resin hull has some pin and sink holes but these are easily filled whilst the upper structure is generaly excellent.


    The effort on putting this baby together comes in the need to reduce both the length and the thickness of the plinth at the base of the V Shaped hull that allows the vehicle to sit on the chassis. I Had a number of goes and have got to a reasonably satisfactory state but will probably try and do better next time round.  


    The hull of the vehicle sits just above the chassis and the nose of the hull almost touches the bush guard.  in this position, the spare wheel is close to the troop compartment and the rising slope of the rear hull panel starts close to the rear axle, Prime Portal has a useful walk round guide. I would recommend the following approach to assembly:
    • Fill lower hull defects
    • Assemble chassis less spare wheel and engine cover
    • File hull base plinth under hull and driver cab (Electric Sander and Mask are useful) 
    • Fit hull to chasis
    • Fit remaining chasis parts, spare wheel and engine cover
    • Fit Hull parts, Seat Back, Roll Bar, 
    • Fit Side panels last
    • Admire


    This provides time for the various bits to dry and reduces the chance of damaging the white metal parts on the hull.  Adding the side pannels last prevents them getting bent whilst you attempt some of the other tasks.

    I could find no standard reference books but there are plenty of images and references on the web. In service pictures of the vehicle  show a few things worth adding as part of stowing and crewing the wagon. I have seen no real evidence of significant external stowage as there were few places to locate it and plenty of oppourtunity for it to get removed whilst driving through the Bush.  The vehicles had a 100 Liter Water and 200 Liter Fuel tank - so no jerry cans needed.  and the large rear panier looked like it held the bulk of the sections kit.


    I have added the rear panier to all my vehicles and built this from plasticard and brass rod.


    Ammo boxes seem to be added to the front and some vehicles support an MG either a .30 Cal Browning or an FN Mag, Brownings are seen with and without shields  Elheim make a very useful .30 which can be used for this.


    Crewing open topped vehicles looks good when the troops are mounted and can look a bit silly when they are dismounted.


     I have gone for sabot bases for my crew allowing them to be removed handy for painting and gaming.  


    I used Elhiems IDF figures part of the Middle East and Africa range which are very good for 80's SADF being armed with the Galil (R4/5 many thanks Mike!) and wearing the kevlar helmet with no body armour.  Crew figures are a handy use for the Uzi armed figures which would otherwise be bound for the bin.  The challenge with Matt's figures is cutting them in half as the alloy used is quite hard, a saw and vice are a little essential.


    For Markings I am using various sets of white numbers and letters which can be seen applied  on the front sides and rear of vehicles although size and location seem inconsitant, I assume these are the vehicles Radio C/S.  Other obvious markings include vehicle registration numbers front and back which appear generaly as white letters/numbers on a black back ground.


    The vehicles are painted an Earth brown which always looks lite in tone in pictures due I assume to the amount of light on the subject and the effects of dust.  I have used Tamiya paints starting with a heavy black pre shade on the lower hull followed by Flat Brown over the whole vehicle, the panels are picked out in desert yellow before overspraying the whole hull in Flat Earth which is a good colour match.


    The tyres and windows have been painted with Vallejo Black Grey.  The Tyres being washed on the sides with buff and dry brushed on the tops by a mix of Vallejo Khaki and Buff following Mig Jemez's rather handy tyre painting guide.  The Pin wash used Humbrol Dark Brown Wash and the Vehicle was dry brushed using Vallejo Buff. 


    The Vehicle is based on a pre cut MDF base from East Riding miniatures which has been covered in sand and white glue and painted in a yellow ocher colour before drybrushing with a range of Vallejo Buff and Mid Stone.  The critical bit with the base is to create a different colour to the wagon, the challenge being with the all brown palette is to get sufficient tonal variation to make it all look interesting. The woody brush plants are created using Horse Hair which has been threaded into holes drilled in the base glued then trimmed.


    The Buffel model is an excellent edition to S&S's growing Bush War range of vehicles and fills a mutch need hole in the list of available affordable war-games models for this conflict and one I have been waiting to see for at least 4 years if not longer,  Top job :)


    References:


    Saturday, 13 September 2014

    Review - Models 1/72, Hobby Den MTLB


    The MTLB was produced from 1970 and included over 80 different variants across the estimated 12,000 vehicles produced.  The primary role of the vehicle was as an Artillery Tractor for Anti Tank or Towed 122mm artillery systems. Additionally the vehicle was used for APCs, Engineer, Anti-tank, Air Defence, Artillery Command and Observation Posts, Air Defence Command and Observation posts and Chemical Reconnaissance.  So a very versatile vehicle, within my forces I currently use them in the Artillery tractor, Command and Observation Post and 120mm Mortar tractor roles and have sufficient to mount a couple of motor rifle battalions if I had a desire to have a Finish or Northern Norway game.


    I am aware of 3 different models on the market though I am sure their are more.  The 3 I have used all have their merits and cover quite different price points and skill levels as follows:
    • ACE currently out of production, if you look hard you can still find them for around £14 a unit.  They build to a very nice model of the system but come with the usual ACE challenges.
    • S&S The S&S model is the simplest of the lot with about 3 parts and has its limitations but it is also the cheapest at £9 including P&P which is excellent value.
    • In the middle of the field is the Hobby Dens offering and the subject of this review at €15 which approximates to £12 most of the time.


    The Hobby Dens model is a resin and white metal re-cast of the old MMS metal MTLB and is a great looking model when built. Both my copies were crisply cast in cream coloured resin with no air holes or significant defects leaving no work to be done on the hull before assembly.  Resin has been used to produce the body of the vehicle and the turret with the hatches doors, weapons and tracks all being cast in white metal.  The white metal parts are well cast with excellent levels of detail and are generally flash free requiring little preparation before assembly.


    Assembly is straight forward and simple, unusually for resin models hatches can be modelled open or closed which provides a lot of options for crewing the wagons as this includes the hatches over the crew compartment as well as the driver and commander.  all the hatches have associated receased hull areas  which allow crew figures to be set into the model.  It's a shame more manufactures don't take the same approach.  


    The completed model builds into a nicely detailed representation of the vehicle which captures the hull shape well.  The model is a little larger than the ACE kit but works well with the 1/72 BMPs and tanks that I deploy it with.  All up a great model and one which with the demise of the ACE kits I will be using in my motor rifle battalions from now on.


    In Soviet service they are generally seen very lightly stowed even when photographed in a range of the post Cold War conflicts.  As ever un-ditching beams are a feature of Soviet vehicles and there would appear to be a number of options for stowing them on the vehicle.


    Either across the back as in the image from South Osettia above or along the side in what looks like a purpose built bracket.   Other than that I have seen images with tarpaulins/boxes stowed on the rear deck or along the side.  The only images of vehicles I have seen festooned with packs belong to the US Army's OPFOR. The marking options pretty much follow those outlined in the post on Soviet vehicle markings with Numbers and formation symbols appearing on the rear door and hull side.


    The exact position on the hull side can vary with some vehicles sporting them on the rearward part of the angled front.


    So with this in mind I have lightly stowed my MTLBs, using plastic rod and green stuff to place an un-ditching beam on to the right hand side of the vehicle along with a tarpaulin and crate on the back decks.


    The two models having a slightly different arrangement of equipment.  Stowage is variously by Black Dog, Goffy.  The crew figure is one of Ellhiem's German tank Crew which make pretty handy Soviet Tank crew as well, The Driver in this instance could have been made for the model.


    I have painted the vehicle in line with my other Soviet equipment in green, although having converted to an airbrush I am now using the following paint scheme:
    • The vehicle is given an overall coat of Tamiya XF-13 JA Green, and is then washed with a dilute solution of  badab black.
    • The panels were then painted over using a mix of JA Green and Tamiya XF - 65 Field Gray.
    • The detail was then picked out with a pin wash of Humbrol Blue Grey Wash.


    • The stowage, tracks and crew figure were painted with a variety of Vallejo colours, the whole vehicle was then sealed with a coat of Tamiya Matt clear and the decals were then applied using Micro set before receiving another coat of Tamiya Matt Clear
    • The vehicle was then weathered using the Humbrol dust wash and an overspray of Tamiya XF-59 Desert Yellow


    I decided to mark the vehicle using both a vehicle identification number and a unit symbol, the unit in  the Soviet army being the regiment.


    The decals used were from the modelcollect large decal sheet which has a variety of regimental markings and stencilled numbers although the numbers lack the variety of size need for the rear door and these I got from a Scotia set.


    The MTLB is based on laser cut MDF bases supplied by East Riding miniatures, these are covered in a mix of sand and white glue before painting.  Once dry a range of basing materials have been used to create the vegetation on the base.


    This is quite an exceptional model of the MTLB and stands up well in comparison to the ACE kit, I would even go so far as to say that I prefer it and in a number of areas it has better levels of detail.  Next years project is a BTR equipped regiment with a towed Artillery Battalion so I expect I will be making a few more.